![]()
![]()
![]()
![]()
Notes on Collecting, Pressing and the Class Herbarium
A Class Herbarium is the focus of many activities in this curriculum and a major class project throughout the unit of study.
Your Class Herbarium will be a collection of plant specimens from your area and a collection of the plant knowledge from your area’s Elders and experts. It will contain all the information that your students have assembled from field collecting and observations, from published field guides, and from interviews. To make the Herbarium, it is essential that your students interview Elders and local experts about plant identification and plant uses. You will need to plan time for those interviews throughout the work weeks. Remember that the information the students collect about the plants will be their “survival” information when the “earthquake” strikes.
There may already be an Herbarium in your school; check with your school library before you begin. If there is an existing Herbarium, you will want to focus on providing additional specimens, updating or adding to information about the plants, or replacing damaged specimens. You may wish to develop a duplicate herbarium to exchange with another school or community.
|
|
What are the steps and principles guiding collecting and harvesting plants? For guidance on local behavior and expectations, you might wish to refer to the values described in “The Right Way to Live as an Unanga{.” “Take care of the land and the waters.” “Don’t do anything to excess.” “Don’t be greedy.” |
Is there a difference between collecting and harvesting? For the purposes of this work with students, you may wish to differentiate between them. Collecting usually means that you find one or two plants that you will take as an example of all the other plants of its kind. That is your specimen. Harvesting usually means gathering plants in quantity for food, medicine, or objects. Harvesting and subsistence can mean the same thing in many areas. Even though you are learning about local plants so that you can use them, activities in this Unit are for the purpose of collecting specimens for identification and not eating them or using them for medicine. That should only happen at the discretion of parents or caregivers.
The most important step you can take to learn about your area’s plants will be to consult with your Elders and local experts for information about your specific location. For general information, the following resources are helpful.
These techniques of “traditional conservation” are adapted from the Web site, “Medicinal Plants of the Kodiak Alutiiq Archipelago” at: “http://www.ankn.uaf.edu/UNITS/medplants.html”:
-
Learn the place and conditions under which each plant flourishes.
-
Know where each plant can be abundantly found.
-
Take time to ask Native Elders if the locale where you are planning to collect is not already a harvesting spot for people.
-
If the plant seems not abundant in the area where it is found, wait to harvest until it can be found growing abundantly. If some harvesting is possible, then take only a few plants.
-
Leave the roots of perennials intact, along with a portion of the leaves so the plant can regenerate. When you do take a root, Janice Schofield in Discovering Wild Plants recommends taking no more than one out of ten roots. If you take a whole root from a plant such as Fritillaria, you can put one of the little bulbs back into the hole you dug. (p. 323)
-
Take only what can be processed and used.
-
Enjoy the process and appreciate the surroundings. Schofield recommends “Sit and meditate with plants. Plants teach you a great deal about themselves.” (P. 322)
Another good resource to guide collecting is Alaska‘s Wilderness Medicines: Healthful Plants of the Far North by Eleanor Viereck. Look on page two, or at the ANKN website, “http://www.ankn.uaf.edu/viereck/viereckcollect.html” for her collecting suggestions and cautions.
WHERE TO COLLECT
Elders and local experts can give you important advice about where to collect.
Collect and harvest only in clean areas. Stay away from roads and sprayed places. Be aware of potentially polluted areas such as old tannery locations, power plants, old oil spills, former military sites. Watch out for other vestiges of World War II such as obscured fox holes, barbed wire, and spikes. In some communities you will want to go away from the school if there has been a lot of modernization such as lawn planting or gravel paving.
You will need to get a permit to go on “Village Corporation Lands,” which are most of the lands in some places. Call the village corporation and ask. When permission is granted, you may be given a card to carry with you. This is to prevent damage from vandalism, shooting, poaching, or driving over tundra with 4-wheelers.
You may wish to select an area that you can use as a habitat in several lessons. These areas should contain flowering plants from representative habitats of beach, bog, meadow, sheltered valley, and exposed mountain.
|
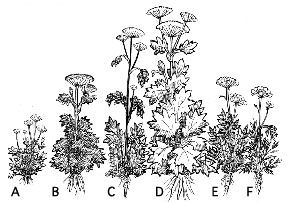
WHAT TO COLLECT Elders and local experts can give you important advice about what to collect. All plant experts caution you: Be certain of the plant’s identity! If in doubt, don’t harvest. When a plant is in flower, it is easiest to identify. Some plants may be harmful to touch. Others contain toxic substances that can make you sick when ingested. A few are even deadly. Listening to local experts and keeping thorough notes are important. In some locations a plant may be poisonous because of minerals absorbed from the soil, but in other areas, it is considered edible. Some plants are more toxic at some times of the year. Collect the entire plant. Include the stem and attached leaves, as well as roots. If the plant is in seed, collect those also. Collect typical plants, not the largest or the smallest. Collect parts that show the full range of a plant’s characteristics. Collect duplicate specimens. One specimen will be labeled for the Class Herbarium and one can be left blank for further identifying and assessment activities. If you cannot identify a plant from the field guides and the advice of Elders and experts, then you may wish to send your duplicate specimen to a plant expert at the University of Alaska or some other location for identification. Recommended guides for plant identification are listed in the Resources Appendix. |
|
|
HOW TO COLLECT
A really good specimen is impossible to make from a wilted plant. If possible, collect your plants in dry weather. Wet plants take longer to press and dry, and may mold.
Unless the material is unusually fragile, collect your plants in plastic bags. Use zip-loc bags (gallon size or larger) or plastic waste basket bags with twisties. It is preferable to use bags larger than the specimens you are collecting. Place the plant parts for one kind of plant firmly but carefully in each plastic bag. Close the bag with air inside to make a protective buffer for the specimen as you carry it back to the class room.
Record a specimen identification on the bag with a waterproof marking pen, using the collector’s initials and a collection number. Usually the collection numbers are in sequence in the order collected. Each collector records the same number in his/her log book along with details about location, size, date collected, aroma, color and texture. Include the plant name, if known. If accompanied by Elders or experts, record all their shared information as well.
|
PRESSING PLANTS
Pressing is a method of preserving plants and flowers that has long been used by scientists. During the summer of 2000, a specimen of the plant Rhododendron camtschaticum, which was collected almost 200 years ago in Unalaska, was exhibited at the Anchorage Museum of History and Art. It still had its bright magenta color and all its parts looked whole and fresh. With care, your specimens will also last for decades, perhaps for 200 years. Put the plant in the press as soon as possible. Generally, the faster a plant dries, the better its color is preserved. Don’t press bulky parts such as woody stems or seeds. Attach parts such as these in plastic bags to the final specimen page. Carefully arrange the plant parts so that they do not overlap or touch one another. Place plant parts so that they are as flat as possible. If you are drying a plant with thick parts or complex flower heads, you may wish to take the plant apart with tweezers, fine scissors, or an x-acto knife so that you can lay the plant flat. A large plant can be folded in a Z or W or N shape to fit your page. |
|
|
Be sure none of the plant hangs outside the pressing paper.
Record the collection number and collector’s initials with the plant. You may write directly on the smooth layer or lay a small piece of paper or other identifying tag with the plant.
Depending on how much moisture your specimens hold, it will take one-to-two weeks to press a plant. You can shorten the time by combining traditional pressing and microwave methods as described below.
You can make a plant press.
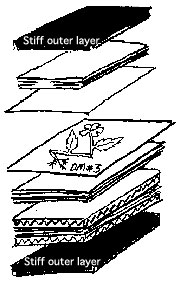
A plant press is like a giant sandwich and usually has these parts:
-
smooth absorbent layer placed next to the plant. The best separator is blotting paper. Blank newsprint can be substituted when used in many layers and changed daily. Any paper that bleeds ink well works because it will absorb the plant’s moisture. This is the layer that directly touches the plants.
-
Separators that absorb water and allow air to circulate, usually paper pages to put under, on and between the layers of plants. Typically this is a stack of pages about 1/8 to 1/4 inch thick. Newspaper can be used, but be sure your newspaper does not rub ink on the specimens. When drying several specimens simultaneously, divide them with sheets of corrugated cardboard.
-
Stiff outer covers such as boards, large books. They make a stiff “sandwich” around the paper and specimens.
-
Weights or tension devices. You can stack books on top to weight down the plants. You can use rocks, or stone or concrete slabs. You can put two or more C clamps around a pair of boards. You can drill holes in the four corners of rectangular boards and insert long screws with wing nuts to adjust the tension.
|
|
You can press plants using your microwave. This method works like other plant presses and will save you several days of drying time. You may also combine this method with traditional plant pressing, using your microwave for the beginning drying and then finishing with your traditional plant press methods. Like most plant presses, the microwave press is a “sandwich” of materials that extracts the moisture from plants while putting pressure on the plants so that they remain smooth. |
YOU WILL NEED (for each microwave press)
Stiff outer layer: 4 pieces of sturdy corrugated cardboard ( 6 inches by 11 inches recommended, or a size to match your intended Class Herbarium). Do not exceed the interior dimensions of your microwave.10 to 12 rubber bands (tension devices)
-
moisture-absorbing layer such as newspaper—2 stacks, each about 1/8 to 1/4 inch thick and cut to the size of the cardboard cover (alternates: felt; old thick wool blankets; or other moisture absorbing materials to place next to the smooth layers of the press)
-
Optional: tweezers, fine scissors, x-acto knife
-
Lay down 2 cardboard pieces.
-
Place a 1/8 to 1/4 inch stack of newsprint on the cardboard.
-
Place the smooth layer—2 pieces of cotton cloth recommended—on the newsprint.
-
Carefully arrange the plant parts.
-
Place another smooth layer on top of the plant parts.
-
Stack another 1/8 to 1/4 inch stack of newsprint on the cotton (smooth layer).
-
Cover the newsprint with the remaining 2 pieces of cardboard.
-
Fasten the entire stack with rubber bands, twisting and doubling the bands where necessary to make as tight a stack as possible. Hold the press carefully when you put on the rubber bands so that the plant parts do not shift around.
-
30 to 40 seconds on high to begin.
Open press for a minute or so to let pieces dry slightly.
Check plant and press pieces. Replace newsprint if wet, wrinkled or scorched. -
15 to 20 seconds on high, next.
Open press for a minute or so or so to let pieces dry slightly.
Check plant for dryness (see test below).
Check press pieces. Replace newsprint if wet, wrinkled or scorched. -
10 to 15 seconds on high to finish.
Open press and check plant.
smooth layer: cotton cloth such as pillowcase fabric—4 pieces cut to the size of the cardboard cover. (alternates: ink-free newsprint —12 or more pieces; blotting paper; or other smooth-surfaced materials to place next to the plant parts.) Cotton cloth is recommended because it contrasts with the newspaper layer when you are unstacking and checking the press, and the flower parts peel easily from the cotton cloth.
MICROWAVE CAUTIONS
Use no metal parts.
Do not look into the microwave while it is on—a recommendation from eye-care specialists.
Time your microwave carefully. You will work with settings timed for a few seconds. If your microwave cannot control by seconds, use a watch and turn the oven off manually. Watch for any signs of scorching or browning on your papers or cardboard. Be sure the press cools and dries between energy bursts. If any scorching or browning happens to your press pieces, replace the pieces with new ones.
Directions
Some plants and plant parts will press better than others using this method. You may wish to test-press your plant if you have enough specimens. Generally, put only one kind of plant part or one kind of plant in the press at a time.
SET UP THE MICROWAVE PRESS
DRY PLANTS with SEVERAL SHORT ENERGY BURSTS:
The time will vary depending on your microwave. Higher watt ovens take less time; lower watt ovens take more time. Each subsequent energy burst is shorter than the preceding ones:
TEST FOR DRYNESS. When cool, gently touch the plant parts between your fingers. The plant should feel like dry paper when touched. Thick plants may take longer to dry. Repeat with one or more short energy bursts, if necessary.
If your plant still seems damp, or if you are not certain that it is dry, you may want to continue pressing the plant under books or in a traditional press for a day or so. Remove the rubber bands before continuing with the traditional press.
When fully dried, it will be time to mount the specimens.
|
A plant press is like a giant sandwich |
Add weights or tension devices. You can weight down the press with books, rocks, or stone or concrete slabs. You can use two or more C clamps around a pair of boards. You can drill holes in the four corners of rectangular boards and insert long screws with wing nuts to adjust the tension. In the microwave press, tension is held with rubber bands. Plant with long stem folded to fit. Note collector’s initials and the collection number matching the log book record. In the microwave press, the stiff outer layer is corrugated cardboard. |
|
|
Separators that absorb water and allow air to circulate. Smooth absorbent layer placed over the plant. Smooth absorbent layer under the plant. Separators that absorb water and allow air to circulate. When drying several specimens simultaneously, divide them with sheets of corrugated cardboard. |
 |
|
MOUNTING specimens for the class herbarium
Use heavy, white acid-free paper with one-hundred-percent rag content, but if not available, use any stiff white paper. The standard herbarium size in North America is about 11.5 X 16.5 inches, but smaller paper sizes may be used for your Class Herbarium. With a very large plant, certain representative parts can be selected and arranged on the specimen page.
Specimens should be arranged on the mounting paper before being glued and laminated. Mount only one specimen to a sheet. Leaves are best seen with some leaves mounted on one side and some on the other side. Labels are mounted on the lower right-hand area or, if the specimen is too large, on the reverse side. Because you will be laminating your pages, you will probably not need to also glue the specimens. If, however, you do need to glue the specimens, Elmer’s white glue is recommended. Spread the glue on a piece of glass or plastic with a paint brush until it is evenly distributed. Carefully place the specimen on the glue with tweezers and then gently lift the specimen and place it on the mounting paper. Wait 24 hours for the glue to dry before laminating or stacking the specimen.
Most professional herbarium do not have laminated pages, but your class herbarium will be subject to handling and pages should be laminated after specimens have completely dried to protect the specimens during use by students and the community. The lamination will also protect your specimens from insect pests, one of the most destructive threats to the Herbarium. You may laminate with school equipment or with clear contact paper. Position the laminating sheet carefully and avoid any air gaps or bubbles.
Completed herbarium are assembled and stored in various forms. Many are stacked sets of specimen pages in boxes and files. Your Class Herbarium will be an important contribution to your community’s knowledge, and you may wish to have students design and build a cover or special box to hold and protect the Herbarium pages.