Sharpening Tools
|
A sharp tool is truly a thing of beauty. A dull tool is the cause of frustration and discouragement. I wish someone had taught me as a young man how to sharpen things. It took many years to learn. I was often frustrated. I did poor work, and broke many of the projects I was working on. There is a unique feeling that comes from passing a hand plane over a board, producing a long thin shaving, or passing a sharp knife through a fish, and with a few strokes, have it ready to hang on the rack. The idea behind sharpening an edge is simple. Reduce the surface area of the blade so it will penetrate the wood, meat, fish, ice etc. with as little effort as possible. A sharp tool penetrates easily. A dull tool has greater surface area on the edge, and resists penetrating. The difference between sharp and dull is most noticeable when using hand tools. When using power tools, the motor does the work. My wife’s grandma tested her knife by holding up a hair. If she could cut the dangling hair with one pass of her knife it was sharp enough for tanning and making rawhide. I have experimented for years trying to learn how to sharpen to that level. There are three considerations in sharpening a tool:
|
||
AngleMany directions for sharpening say, “Sharpen the tool at 30° or 25°.” The material we are cutting and the toughness of the steel in the blade determine the best angle to sharpen the edge. I often wonder how the manufacturer could pretend to know what I am cutting. |
|||
Picture the Extremes Imagine trying to chop a tree with a splitting maul. The blade is too thick. It will never penetrate the wood deeply enough to chop down the tree. Imagine again trying to cut down the same tree with a razor blade. The blade can penetrate the wood fibers, but is so thin it will break on first impact. Conclusion: if a blade is too thick, even if the edge is sharp, it will take too much energy to penetrate. If the edge is too thin, the blade will break. |
|||

|
Direction of ForceConsider the direction of the force you are using. If the blade is shaped like #1 on the left, much of the force used to cut (penetrate) is used in pushing the material away. Little of the force is used in parting the material, which is what you want. If the blade is shaped like #2, the blade will penetrate easily, but the slightest sidewards motion or hard obstacle will break the thin steel. This is the shape of a razor blade. It will cut hair (and skin) well enough, but couldn’t be considered for wood or bone. What should the angle be for sharpening a blade? Once you know the quality of steel in the blade and the material you are cutting, then you can figure out the answer to this question. |
||
The RuleYou want an edge thin enough to penetrate easily, and thick enough to last a while. If you are sharpening the edge often, you need to thicken it a little. If you are working too hard, thin the edge a little. |
|||
Mixed MaterialIf we cut only soft wood or meat, it would be easy to figure how to sharpen an edge. However, wood has knots, meat has bones, and so do fish. If we sharpen a knife to cut fish and don’t think of the bones, our knife will soon be dull. |
|||
|
|
Width of the EdgeThe actual width of the edge is very important. If you were to look at a dull edge under a magnifying glass, it would look like this:
If the surface area of the edge is reduced, the pressure required to penetrate the material is greatly reduced. With a sharp edge like the one on the left, the surface area is almost zero, and all the force can be used in separating the material. This makes a tremendous difference if you are cutting fish all day. If the edge is chipped, it obviously has a large surface area that resists penetrating the wood, meat or fish. One chip in a knife or axe can make a tiring difference. New axes or other tools always come with an edge that is far too thick. You must thin the edge to your needs. As you sharpen, there will be a hair of metal that clings to the edge of the blade. In some applications, you will want to remove it, but for cutting fish or meat, that “hair edge” helps sever the meat. |
||
Digging ToolsA hoe, pick, or shovel should be sharpened to make digging easier. The thickness of the edge is determined by the kind of dirt you are working. If it is loose soil with no rocks, the edge can be thin to cut roots. If there are hard rocks in the soil, the edge must be thicker. |
|||
| A.
Fiber cutting tooth
|
|
||
Stones, Files, and SteelsThere are three ways to shape a blade: • With a file. Files work well on softer steels. • With a stone. Hand stones do well on hard steels, but don’t work as fast as files. • With a sharpening steel. Steels put a good finish cutting edge on a knife to be used for meat or fish. They don’t remove much material. They shape and texture the edge. Some sharpening steels are embedded with durable diamonds. Some sharpeners are made of porcelain. Coarse or Fine? How much of the blade must be removed? Coarse. If there is much steel that needs to come off, a coarse file or stone is faster. However, caution must be taken with electric grinding wheels. Friction overheats the blade so that it loses its temper1, turning the edge soft and blue. It will then dull quite easily. Fine knifemakers grind the blades under water to keep the steel from overheating and to keep the grindstone from plugging with filings. Fine. If there isn’t much steel to remove, a fine file or stone is in order to put the finishing touches on the edge. Some people oil a hand stone to float the ground steel filings. Other people use saliva. Either method keeps the stone from becoming glazed and plugged. It can’t cut steel with the abrasive particles hidden under a layer of debris. Care of Files When filing, it is important to put pressure only on the forward stroke. The teeth are strong in a forward direction. If pressure is applied on the back stroke, the teeth are damaged. Files must be protected from moisture. They rust easily. Also, they become dull when they impact other hard metals. Oldtimers often wrapped a file in an oily cloth to protect it from rust and contact with other tools.
Pressure
on forward stroke. |
|||
|
File or Stone? How hard is the steel you are sharpening? I prefer to use a file on softer steels. If the steel of the blade is as hard or harder than the file, the file will slip on the blades surface. The result is a damaged file (expensive). For me, files work much faster than stones. I avoid buying knives and axes that are too hard. Granted, the harder steels keep an edge longer, but they are far more tedious to sharpen. Hardened Steel If an axe strikes a rock, the steel at the point of impact is hardened. When an individual goes to file the axe, the hardened spot will destroy the file within a few strokes. Careless people don’t understand the damage they do to an axe by driving it into the dirt. |
|||
|
Top plate |
Sharpening a ChainsawThere is nothing mystical about sharpening a chainsaw. Like a Swede saw, it is cutting simultaneously in two directions.
The side plate angle is determined by what you are cutting. If you are cutting rather dirty wood, like driftwood, you might want to sharpen the side plate thicker at about 25°. This puts more steel behind the cutting edge for strength. If you are cutting very clean wood, you might be able to sharpen the edge thinner, perhaps 35°. A thinner side plate cuts faster and more efficiently, but dulls easier. |
||

File
too big |
The top plate angle is determined by the file size. A file too small will undercut the tooth, making it very thin. A file too big will make the top plate too thick. It will scrape rather than cut the wood fibers. Ripping Many Alaskans make lumber with a chainsaw. It is rough lumber and puts considerable wear on a saw, but in remote locations, there is no other lumber to be had. The top plate angle is critical. Long shavings are being peeled out with the grain of the wood. If the file is too big and the resulting edge is too thick, ripping will be painfully slow. The side plate angle isn’t as important for ripping because ripping goes with the grain of the wood, not across it. If the log is very clean, I use an undersized file. It gives quick, clean, long shavings (but dulls quickly if any dirt is encountered). I often peel the trees before I rip them to remove the dirt hidden in the bark from flood waters of the past. Oldtimers peeled the trees before they cut them down with Swede saws to extend the life of the sharpened blade. |
||
 |
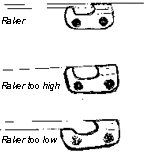
Rakers The rakers determine how deeply the chainsaw tooth cuts. If the rakers are too high, the tooth cannot bite into the wood. The operator has to push very hard for the tooth to cut. The increased friction of this effort quickly wears the bar and chain. If the rakers are filed to the proper length, the weight of the saw is enough to feed the saw into the wood. If the rakers are too short, the chain will bite too deeply into the wood and frequently get stuck. Rakers that are too short produce very rough lumber and cause excessive clutch wear. If the rakers are of even height, cutting is smooth. If the rakers are of uneven height, some teeth will bite more than the others. Cutting is very erratic, putting great stress on the chain. The saw can easily kick back at the operator. |
||

|
ActivitiesNote: In the following activities you are asked to use tools and blades. There is obvious danger. Be careful!
|
||

|
Student Response
|
||

|
Math
|

 How
thick or thin should I make the edge?


 Sharpened
on One Side
 Rough
or Smooth
 Pressure
on back stroke.
 Side
plate