|
|
|
Observing Snow
|
Snow On the Ground Changes
Through Time
To understand the changes in the snow pack through time,
we must first consider the mechanical breakdown of the
intricate, delicate, crystals of falling snow into
relatively round mature ice grains. The delicate arms of a
snow crystal are easily broken. Constant motion and
vibration of the water molecules breaks off the delicate
exterior features. Ultimately, these pieces lodge in the
spaces between the crystal's arms. Through this process of
destructive metamorphism, the original crystal
eventually becomes a rounded ice ball. Most of us have
observed a decrease in volume as snow settles through time.
Destructive metamorphism dominates when there is NOT a
significant temperature difference from the top of the snow
pack to the bottom. Typical conditions could be located in
the top layers of the snow pack, or during warm spring days
when the outside air temperature is similar to the ground
temperature. The literature often refers to this process as
equi-temperature metamorphism, but classroom
experience proves that simpler terms communicate the
concepts more clearly.
In nature, crystals lose their points due to molecular
motion, wind, and direct pressure. Physically breaking the
snow crystals, for instance stomping on them or disturbing
them with a shovel, will produce the same effect. The
crystal arms are broken and then rounded grains fuse by
freezing into larger crystals in a process called
sintering. Snow crystals resulting from destructive
metamorphism make good snowballs...they compact easily and
this part of the snow pack can become very hard and
dense.
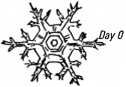
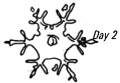
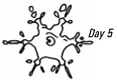
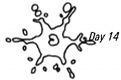
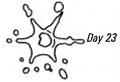
The destructive metamorphism of a stellar snow
crystal.
From a "Field Guide to Snow Crystals" by Edward
LaChapelle
|
Chapter
English /
Language
Arts
Content
Standards
B - 1, 2, 3
|
|
Science
Content
Standard
A -14 (a) |
Late in the spring, daytime air temperatures will rise
well above freezing causing the ice crystals in the top
layers to melt. The water percolates downward through the
snow pack and eventually refreezes. We refer to this process
as Melt - Freeze Metamorphism. During the day, when
the snow is warm, it forms a wet granular layer of slush
often nicknamed "corn snow." When the sun sets,
freezing temperatures harden this layer into an icy sheet. A
deep melt-freeze episode results in a hard, crusty layer
that frustrates animal movement, and often covers the
available food supply in a frozen sheet of ice.
Ice crystals also become bonded together due to pressure,
and often from the weight of the snow pack above.
Pressure Metamorphism causes individual ice grains to
change into larger ice crystals. These forces make the snow
pack very dense and very strong. Firnification
occurs if enough time passes so that both meltfreeze
processes and pressure create very large and dense ice
crystals. If the firn is compressed further into even denser
and larger ice crystals with very little air pockets; the
result is glacier ice.
We will study more about the movement of glacier ice in
Chapter 5.
|

The transition from snow crystals to firn crystals to
glacier ice
From "Glaciers" by Michael Hambrey & Jurg
Alean
|
Constructive
Metamorphism
As the winter season progresses and snow accumulates
on the ground, the snow itself becomes an important insulating
layer. The blanket of snow helps retain the latent heat of
the ground. Temperatures at the ground's surface tend to
hover within several degrees of freezing. Conditions can be
significantly warmer on the bottom of the snow pack than at
the snow's surface, where it is exposed to the chilly arctic
winter air. If the temperature gradient is at least 18° F per meter,
then the process of constructive
metamorphism, where new crystals are actually formed,
dominates.
The water vapor present near the warmer ground surface is
under higher pressure than the cool water vapor at the top
of the snow pack. Natural dispersion of energy causes water
vapor to move from warmer to cooler, and from higher vapor
pressure to lower. The greater the temperature gradient from
bottom to top, the more quickly the vapor transfers. As the
water vapor contacts cooler temperatures it crystallizes
directly from vapor to frozen solid ice crystals in a
process called sublimation. Crystals can change from
solid to vapor, or vapor to solid, without ever passing
through the liquid state.
In a snow pack with a significant temperature gradient,
large six-sided, cup shaped depth hoar crystals form
a loosely packed layer at the bottom. Many small
non-hibernating mammals depend upon these loose snow
crystals for easy construction of tunnels throughout the
subnivean environment. This "sugar snow" can
often be the weak and unstable layer that causes avalanche
hazards.
depth hoar crystal  |
Science
Content
Standard
A - 4, 8 (c), 9 |
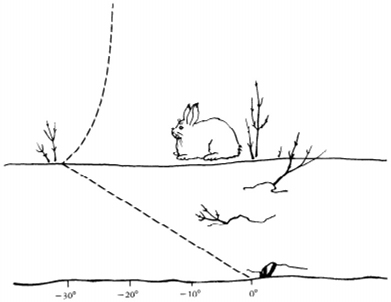
Air/Snow Temperature in degrees Centigrade
The nighttime temperature profile over snow covered
ground.
Air temperature is lowest on a clear night right at the snow
surface.
The ground temperature is relatively stable hovering around zero
degrees Centigrade.
From "Life in the Cold" by Peter J. Marchand
|
Science
Content
Standards
A- 4,15
B-1,2,3,4,5,6
|
|
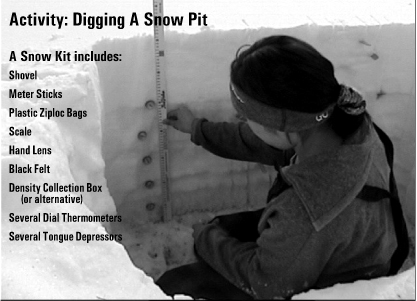
A student is recording temperature
every ten centimeters in the snow
pit
The objective of this practical exercise is to
use, illustrate, and confirm the concepts presented
thus far in the curriculum. The class digs a snow
pit, records data and then analyzes it back in the
classroom. The class documents temperatures
throughout the snow pack and observes differences
in snow crystal structure and metamorphism in the
snow pack.
|
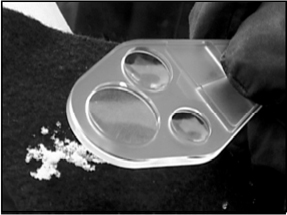
A density box is a wonderful professional tool. It is
included in the Denali Foundation Snow Kit, or can be
ordered (see the Resource Appendix.) In a pinch here's an
alternative. This method is very functional, but depends on
knowing that density of water is 1 kg/liter. In a classroom
it does not illustrate the concept of density as clearly or
easily as having a box of known volume.
A Homemade Snow Sampling Density Box
- Use two #10 cans.
- Using a marker and ruler, calibrate one in equal
increments from 1 - 100. This # 10 can should have a
bottom, but no lid.
- Remove both the top and the bottom from the second
#10 can. This will be your snow sampling tool.
- Using the sampler tool, carefully insert it
horizontally into the snow pack, trying to fill it
without disturbing the crystals. When you think you have
a good sample, brush away the surrounding snow and
carefully slide it out. Slice off any extra snow that is
hanging over the edges of the can.
- Dump your sample into a plastic bag in order to
transfer it to the other can.
- Put your snow sample in the calibrated #10 can in a
warm place and allow it to melt.
- Record the measurement of the water line after total
melting.
Your measurement will correlate directly as a percentage.
If you measure 18; the density will be 18% or 0.18 kg/liter.
This works easily because the density of water is the
standard, 1 kg/liter.
|
|
The Snow Observation Journal contains detailed snow pit
directions as well a data collection sheets. In order to
classify crystals, student will use the charts provided in
the Snow Observation Journal.
It often works well to appoint a recorder for each snow
pit group. The recorder will need a clipboard and pencil to
note the observations, while the other students can
participate in the various steps of collecting data from the
pit.
Groups of 3-5 students work nicely.
- Orient the length of your pit perpendicular to the
sun so that the exposed wall will be in the shade. Dig a
pit, exposing a wall of snow approximately 3 feet wide
and at least 6 feet long. Be careful not to disturb the
wall where we are going to take measurements!
- Insert measuring sticks on either side of the snow
wall with the zero end sitting on the ground.
- Slowly slice the snow pack using a wooden tongue
depressor like a knife. You can feel the changes in the
snow pack as you move it through the snow. When you feel
a change, place your tongue depressor sideways across the
layer to mark it. Observe and tell the recorder at what
depth these changes occur. These are the layer
boundaries. Repeat this process until you reach the
ground. You may also be able to see the different layers.
Record and draw all observations.
- Take temperature measurements of the ground, air, and
snow pack at 10 cm intervals.
- Classify snow crystal types every 10 centimeters.
Carefully scrape the crystal sample onto the black felt.
Using a hand lens and the classification charts provided
in the Snow Observation Journal, record the types of
crystals found at each depth and on the surface.
Remember, once snow lies on the ground it begins to
change, and the crystals you will observe will probably
fall into one of the metamorphic categories.
- Using the density box, take a snow sample from the
top and bottom of the snow pack. Weigh each sample and
record density calculation on the Data Collection Sheet
found in the Snow Observation Journal.
- If skis are available, a shear test can be preformed
to determine which layer is weakest and may imply risk of
avalanche. The skier should stand parallel to the snow
pit wall about 1 foot away. If nothing happen the skier
should start to gently bounce and work up to small jumps.
Observe the layer that the snow slides on, and how easily
the slide occurred.
Snow Pit Sketch

When drawing your Snow Pit Sketch include:
meter sticks, layers, temperature, density data collection
points,
and any other visual observations
|

Snow Journal
pg. 14
Technology
Content
Standards
A - 2
C - 1, 2, 3
Math Content
Standards
A -1,2,3,4, 5,6
B-1,2,3,6,7,8
Problem
solving
Performance
Standard
age 11-14
2
Statistics /
Probability
Performance
Standard
age 11-14
1
Math
Communication
Performance
Standards
age 11- 14
2,3
|
|
Snow Journal
pg. 19
Math
Content
Standard
B - 1
D - 1,2,3,4,5
Problem
Solving
Performance
Standard
Age 11-14
1
Science
Content
Standard
C-2, 7
Reasoning
Performance
Standard
age 11-14
1
|
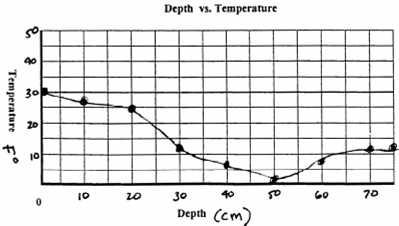
Classroom Analysis of
Data:
Once back in the classroom the group members share
their data observations so each student can fully complete his or
her own Snow Observation Journal. Each student completes a
graph of the relationship between snow depth and
temperature. A gradient of 0.18° F / cm is sufficient
to drive the vapor transfer process.
"Was
a significant temperature gradient present?"
The next step is to calculate the density of the
snow samples found at the top and bottom of the snow pack.
The sample volume is constant, the size of the box, 200 cm3.
A simple Density = Mass/ Volume will give the
required result.
A teacher should do an example of these calculations for
the class on the board using data collected from one group.
Caution! Do not mix data from different pits or you will
have trouble interpreting the results.
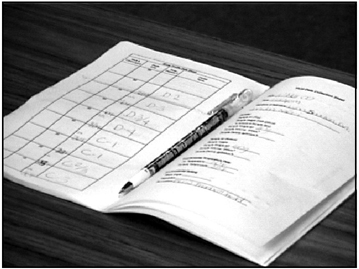
The Snow Journal with data and observations from
the Snow Pit
|
As a class, determine:
- Was there a significant enough temperature gradient
to drive the process of constructive metamorphism? (0.18°F/cm is
needed.)
- What different types of crystals did you identify?
- Where were the crystals located in the snow pack?
- Can you use the three different concepts of metamorphism to
explain the types of crystals found?
- Do you have any direct personal knowledge of the past winter's
weather that could help explain the types of crystals found in the
snow pack?
- Was the snow more dense at the top or the bottom? What
processes that we have learned can explain your observations?
- From what part of the snow pack is water traditionally
collected from and why? (This can be kind of tricky. The loose
pack depth hoar is usually thought to contain less water. Although
the crystals are not tightly packed, the individual six-sided cup
shaped crystals actually contain more water than a destructive
metamorphism snow crystal. A bucket full of them melted over a
fire will produce more water for your effort.)
Galena Project Education Residential School results from our
classroom analysis of data
| ACTIVITY: Building a Snow
Shelter
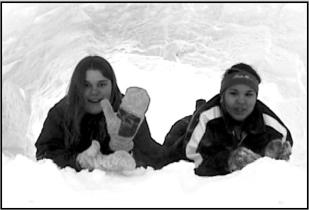
Galena PECS students in the Snow
Shelter
This is a fun way to use up some excess energy while
doing a practical lesson in destructive
metamorphism. Building a quinzhee (snow shelter) is a
traditional survival skill.
As snow crystals are physically broken they form
rounded ice grains. With less space between the
individual ice crystals, the disturbed, broken crystals
pack together tightly. These ice grains will rebond upon
contact with each other, a practical example of
sintering. Snow resulting from the processes of
destructive metamorphism is dense and strong. Not
only is this good snowball snow, but it makes an
excellent building material for a winter shelter.
This exercise is best done on two separate days so
snow can recrystallize and bond overnight. Five to eight
students is a nice size group for each quinzhee.
Day One:
Depending upon the location of your quinzhee, one or
several students may have to break trail to the
construction site. Breaking through uncompacted snow
versus easy walking on a well worn snow trail is another
excellent example of destructive metamorphism
rendering snow dense and strong.
It is best to stomp down the snow on the bottom layer
of your quinzhee before beginning to pile snow on top.
Next let the students shovel their hearts out. A typical
quinzhee can be up to 10 feet in diameter and 10 feet
high. Your finished size will vary depending upon the
time allotted, available snow, and the energy level of
your group. You can insert sticks approximately twelve
inches long, perpendicular to the mound surface to use as
a thickness guide when excavating.
Day Two:
Students begin by digging an entrance from either
side, as well as a top hole. Once the initial tunnels
connect the interior space is excavated. A consistent
wall of about 12 inches thick is sturdy.
It can be incredibly informative to have the students
destroy the quinzhee at the end of the exercise. It may
not be safe to leave the quinzhee unsupervised, and it is
usually extremely difficult to break the structure. The
snow has become quite strong and dense indeed!
|
TERMS:
Constructive Metamorphism: The process where a significant
temperature gradient causes warm water vapor to rise from the earth
upwards through the snow pack. As warm vapor contacts cool
temperatures, it sublimates and forms large, six - sided,
cupshaped ice crystals. Another name for this process is
temperature gradient metamorphism.
Corn Snow: Clusters of large, rounded ice crystals, formed
by the processes of melt-freeze metamorphism.
Density: The degree to which the atoms of a substance are
packed. Density is a measure of the mass per unit volume. Density
= Mass/ Volume. Snow in interior Alaska has a density of 0.18 -
0.24 kilograms per liter. Water has a density of 1 kg/liter.
Destructive Metamorphism: The change in snow crystals from
delicate six-sided shapes to rounded, bonded ice grains due to
disturbance, molecular motion, and pressure. This process is NOT
dependent on a significant temperature gradient.
Depth Hoar: Large, six- sided, cup-shaped ice crystals that
grow on the lower layers of the snow pack as a result of vapor moving
from the warm earth up through the snow pack. The process of
constructive metamorphism depends on a large temperature
gradient to move the vapor upward.
Firnification: After one year, snow that has become hard
and dense due to the processes of destructive metamorphism is
classified as firn. During this transformation to glacial ice,
the crystals and the small air spaces between the ice grains are
squeezed by the pressure of the weight and motion of the surrounding
ice. Typical conditions will yield glacial size ice crystals with
distinct air bubbles in about 5 years.
Glacier Ice: Well-bonded ice crystals compacted from snow
with a bulk density greater than 860 kg/m3. Air becomes trapped
inside the crystal fabric in the form of bubbles.
Melt Freeze Metamorphism: The process where ice crystals
form clusters of large crystals due to the melting and percolating of
water through the snow pack, and then refreezing. These conditions
typically occur in spring during warm sunny days and cool nights. If
this layer becomes buried, it forms an ice slab, that may present
avalanche danger.
Metamorphism: To change in an important way.
Pressure Metamorphism: The process where ice crystals
become larger, rounder, bonded due to weight from above in the snow
pack.
Sintering: The process by which two particles weld together
without liquid present.
Subnivean: Below the snow cover.
Sugar Snow: The common name for depth hoar, the
large, cup-shaped crystals that form in the bottom layers of a snow
pack due to process of constructive metamorphism.
Sublimation: The direct passage of a substance from solid
to gas or gas to solid without appearing in the intermediate liquid
state.
Temperature Gradient: The relative difference in
temperature between the earth, the snow layers, and the outside air.
The process of constructive metamorphism prevails when the
gradient exceeds 0.18°F / centimeter.
Observing Snow
Introduction
The Four Corners of Life
Water: the Stuff that Makes Snowflakes
Snow on the Ground Changes Through Time
Exploring Native Snow Terms
Glacier Investigations
Open Note Review
Conclusion
Bibliography & Resources
|
 The
University of Alaska Fairbanks is an Affirmative
Action/Equal Opportunity employer, educational
institution, and provider is a part of the University of Alaska
system. Learn more about UA's notice of nondiscrimination. The
University of Alaska Fairbanks is an Affirmative
Action/Equal Opportunity employer, educational
institution, and provider is a part of the University of Alaska
system. Learn more about UA's notice of nondiscrimination.
Alaska Native Knowledge
Network
University of Alaska Fairbanks
PO Box 756730
Fairbanks AK 99775-6730
Phone (907) 474.1902
Fax (907) 474.1957 |
Questions or comments?
Contact ANKN |
|
Last
modified
August 17, 2006
|
|
|